You can buy the TF360 on Amibay.

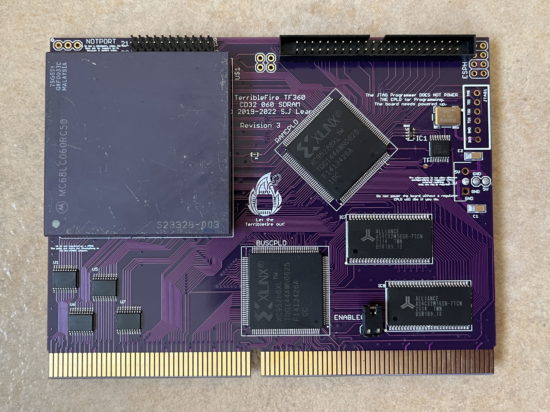
The TF360 is an Amiga CD32 accelerator that mounts 128MB SDRAM and supports any PGA version of the 68060, all revisions, including LC (no FPU) models. Contrary to many expectations, the 68LC060 CPU works great, provided that the system is configured in a way to avoid using FPU libraries. You can download an example disk image that contains OS3.1 and all the necessary libraries and utilities for the TF360. It is compatible with both the LC060 and the full 060 CPU. This disk image can be written onto an 8GB CF card using Win32DiskImager, or can be mounted as a WinUAE hard file, in case you prefer to copy files manually. Please note that all 68060 systems (including LC) require that the 68060.library be installed beforehand. It is part of the MMU.library v46 package that can be found on Aminet.
When a CF card is connected, the system will boot from the CF card, allowing you to play WHDLoad games, without having to use CD games.
If a CD is in the drive before the console is powered up, the console will still boot from CD first, however please note that some CD games won’t work when the TF360 is plugged in as they were not originally designed to run with a faster processor and more RAM. Luckily, most games are already available in WHDLoad patched format so it won’t be necessary to use the CD games. You can disable the card by removing the ENABLE_060 jumper, or wiring it to an external switch.
Installation
Remove the screw holding the expansion cover at the back of the console and remove the cover (if present). Plug in the TF360 in the upper slot on the riser and slide it inside the console. Once you power the system up with the expansion plugged in, you should see an initial rainbow screen indicating that the card is booting. After a few seconds, the screen will flash again indicating the system reset, after which the boot process will begin.
Note: In case the TF360 is not recognized, it may be necessary to clean the expansion connector using a paper towel soaked with IPA alcohol. Pay attention to corner areas as they tend to get the most oxidation. Make sure to dry the connector before powering on.
The IDE interface is mapped under the scsi.device driver found as part of Kickstart 3.1 ROM. CF card adapters version V.B4 and similar are not going to work, so you should use the V.H2 version instead.
Boot process
After powering on the CD32, you will see a brief rainbow screen. After a few seconds, you will see the traditional AmigaOS screen “flash” indicating a reset, after which the card will start the boot process. If the boot process does not start after 10 seconds, or if you do not see a rainbow screen, take out the card and clean out the contacts on both the 360 and your console’s expansion connector.
“Notport”
The header above the CPU is provided, but not officially supported, for expansions such as A1200 RTC kits. Things may or may not work when connected… there is no official support either way.

How to connect a “Notport” RTC device
Fan header
in the leftmost corner of the board, you can find a fan header. This can be used to power a small CPU fan. Please note that this header is only 5V.
Riser
You can use the RGB port to plug in a Commodore CRT monitor, or an RGB Scart cable.
You can use the PS/2 connector to connect a standard PC style keyboard. Please note that USB keyboards with a converter will not work. You need a keyboard that has a native PS/2 minidin connector. If your chosen PS/2 keyboard does not work, the fault may lie with the power supply which is providing insufficient power. In this case, try finding a keyboard that uses less power or replace your power supply with a more powerful one.
If you want to use an Amiga (A3000/A4000) keyboard with the console, you can plug it into the AUX port on the left side of the console, however in this case, you have to remove the PIC chip on the riser.
CPU SPEED Beta firmware
UPDATE 2022/04/11:
The new firmware lets you select the CPU speeds of 50, 59, 60, 63 and 67 MHz.
To change the CPU speed, issue the following command:
Cpuspeed speed=XX
…where XX corresponds to the desired speed in MHz.
94 MHz may or may not work at this time. You can try it by typing the following command:
Cpuspeed speed=94 phase=3
Upon reset, the board always reverts back to 50Mhz.
For this to work, you need to have a board updated to the 44c1f4c firmware dated 2022/04/11 (this will be published after testing). The other boards can also be reflashed, please see the bottom of the page.
LC CPU notes
When installing software with the LC CPU, you should always select 020/030 executables whenever possible. This is because the Amiga compilers always default to FPU code when compiling 060 executables, which will cause the software to crash on CPUs that do not have an FPU.
It is however possible to compile software specifically for the LC060, for example see the ZDoom Amiga port (included in the CF card image linked above) which contains an LC binary file.
The best way to think about the LC060 is to consider it like a very fast 68030 CPU and install the same libraries and files that you would install on a 68030 system.
Update 2022/12/08:
Thanks to Thomas Richter, a proper AmigaOS FPU emulator called
“SoftIEEE” is now available. This fantastic tool will let you run FPU
software on LC060 without crashing. The caveat is that the FPU emulation
will be slow, so if you have a choice between LC060/SoftFloat builds
(software compiled with the -nofpu switch), those will still run much
faster than FPU versions, however now you will be able to run software
that does not come compiled with this option. The SoftIEEE is already
included in my disk image and it can also be downloaded separately from Aminet.
CF Card
If you bought the board with a CF card, by default it boots into NTSC screen mode, so you should make sure to have a display compatible with this mode (some versions of the OSSC do not support this). The default screen mode can also be changed through the Workbench Screenmode tool. Please note that even if you are using an NTSC screen mode by default, some games will only run correctly in PAL mode. To force a game to run in PAL mode, you can edit its icon Tooltype and add the keyword ‘PAL’, then save.
If you are unfamiliar with AmigaOS, here’s an example of how to do so:
Open the game directory that contains the game/demo that does not run properly in NTSC mode. For example, Superfrog. Click on the icon once and then select Information from the Icons menu:

You will be presented with the icon information. Click on the NEW button then type PAL:

Press ENTER, the tooltype will be added to the icon:

Next time you launch the game, it will be launched in PAL mode. Repeat this process for all the games that do not run correctly in NTSC mode.
Please note that regular NTSC TVs will not display PAL video modes. Most likely you will get a black and white rolling picture on a CRT, or a “signal not supported” type of message or a blank screen on LCD TVs.
In cases like these, you should consider getting a PAL to NTSC converter device that can be obtained cheaply from Amazon. These can either be analogue (they convert the composite signal on the fly), or RGB to HDMI type of converters. The latter produce a better-quality image, but can sometimes cause lags in games.
Known issues
The following issues are known and being worked on:
- Overclock is limited to 67 Mhz (some cards are able to achieve 94 however);
- CD Drive does not read data CDs properly (the drive will spin and attempt to read the CD but it will often time out, this will be fixed in a future firmware update. For the moment you can use the disable jumper to disable the card and the CD drive will work correctly again);
Firmware updates
Please follow this thread that explains how to update the firmware in various ways. In the thread, you will find several guides as well as youtube videos explaining the process. Even though the guides were originally created for the TF1260, the process to update the TF360 is identical, including the CPLD order.
Firmwares
This section will contain firmware updates once they become available. Note: always use the 10ns firmware version. Do not use the ehide.device, it is not applicable to the TF360.
| Firmware | Date published | Applicable to boards (built by alenppc) with serial numbers |
Comments |
| 8cdadc2 | 2022-10-30 | 1, 2, 4 |
Speeds |
| 44c1f4c | 2022-11-04 | 1, 2, 3, 4, 7 |
Makes it possible to change the CPU speed up to 67MHz; Fixed the
|
| 2023-01-04 | 1-12 |
Fixes the disable jumper issue. |
|
| 2024-06-21 |
The fw released on 2024-06-21 has been removed as it casues issues with full CPUs.
|
